Please comment below!
Friday, 13 September 2013
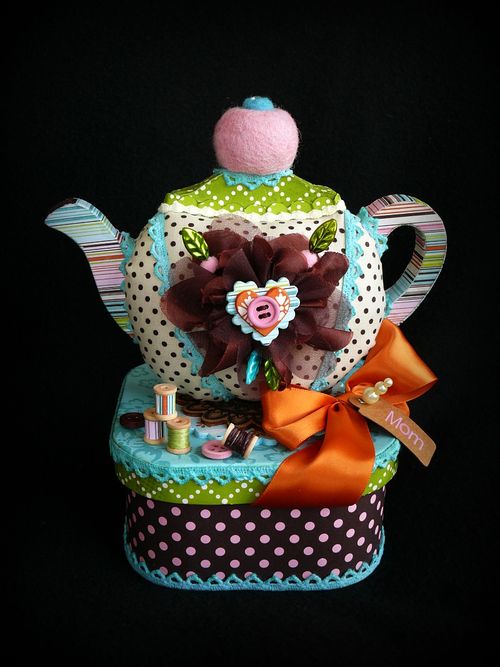
Your favourite Sewing Toolbox
Recently I did a post on my favourite sewing toolboxes. You are welcome to vote for your favourite one that I have shown, or tell me one of your personal favourites.
Saturday, 7 September 2013
Sewing Rule #1- Instructions
There are many rules in the sewing world. A very important one is:
Read through all the instructions before you do a project
This can be crucial to your project. You don't want finish your project and realise you misunderstood the instructions, so that your piece is lopsided and ruined forever. The end.
But when you read through the instructions before commencing your project, your piece will be marvellous and sell for $200.
So, once again, always read the instructions before sewing.
By the way, this is how you will feel when you have read through the instructions:
Hemming stitch
Hemming stitch is used for hemming. It is sort of like blanket stitch.
How to do hemming stitch:
1. Tie knot in thread.
2. Fold a seam and pin in place.
3. Bring the needle through the fabric below the fold { as small as you can do it } about one tiny weave in the fabric. Do not pull yet.
4. Bring needle also up through the fold { as small as you can do it } about one tiny weave in the fabric. Now pull thread through.
5. Repeat sequence.
Apologies for confusing instructions. Images coming soon.
Friday, 6 September 2013
Sewing tool boxes
If you sew, have fun with your sewing tool box! They are great to decorate or you can buy one that looks cute.
Below are some images of my favourite sewing tool boxes/sewing kits found on Google images.


Below are some images of my favourite sewing tool boxes/sewing kits found on Google images.
More cute sewing boxes...coming soon
Whip stitch
Whip stitch is very simple. It is used to join a fold to a fabric or two fabrics together.
How to do whip stitch:
1. Make a fold { if you haven't got one already }. Pin in place.
2. Thread needle and secure in fabric.
3. Bring needle up through the fold
4. Bring needle down through the fabric diagonally below the fold .
5. Repeat sequence.
Below is an image of the whip stitch.

How to do whip stitch:
1. Make a fold { if you haven't got one already }. Pin in place.
2. Thread needle and secure in fabric.
3. Bring needle up through the fold
4. Bring needle down through the fabric diagonally below the fold .
5. Repeat sequence.
Below is an image of the whip stitch.
Kids Crafternoon- Sewing
I recently borrowed a sewing book from my local library. I was thrilled to see so many new, fun ideas. Later, after I have completed some of these projects, I will do a post on them.


Wednesday, 4 September 2013
How to make a feltie
There are dozens of felties to choose from and make. Later on, I will do a post on felties.


Stem stitch
The stem stitch is the opposite side of back stitch. The only difference is that you are trying to make the back of back stitch straight which is stem stitch. Hold the fabric where you will do stem stitch to face you.
How to do stem stitch:
1. Thread your needle and bring through the fabric 3 or 4 times to make it secure.
2. With the needle and thread facing the opposite direction you are in, do a starting stitch { - } .
3. Bring the needle up through the fabric and back to the start where you threaded your needle.
4. Repeat sequence.
My apologies if these instructions are confusing.
Below is the stem stitch in green thread. The yellow stitch is back stitch.

Monday, 2 September 2013
Sewing Work Book
Every sewer should have their own sewing book to place their ideas, samples and designs into.
I bought mine at Officeworks { http://www.officeworks.com.au } for $9.45. It has a hard cover with blank pages.
The other option is to buy a portfolio with plastic pockets, making it easier to keep your samples in.
Below is my sewing work book.

I bought mine at Officeworks { http://www.officeworks.com.au } for $9.45. It has a hard cover with blank pages.
The other option is to buy a portfolio with plastic pockets, making it easier to keep your samples in.
Below is my sewing work book.

Back stitch
Back stitch is the strongest of all stitches. They form lines and are most often used to outline shapes or to add detail to an embroidered picture.
How to do back stitch:
1. Thread needle and bring up through fabric. Then bring needle down through fabric. Repeat sequence 2 times, going over the previous stitch. This will be more secure than tying a knot.
2. Bring needle up a stitch length away.
3. Bring needle back down to where you started.
4. Bring needle up at stitch length away from step 2.
5. Repeat sequence.
As you will see, your stitches are going forward, then backwards.

The yellow stitch above is the back stitch. The green stitch below is the stem stitch.
Always try to have straight stitches.
How to do back stitch:
1. Thread needle and bring up through fabric. Then bring needle down through fabric. Repeat sequence 2 times, going over the previous stitch. This will be more secure than tying a knot.
2. Bring needle up a stitch length away.
3. Bring needle back down to where you started.
4. Bring needle up at stitch length away from step 2.
5. Repeat sequence.
As you will see, your stitches are going forward, then backwards.

Always try to have straight stitches.
Subscribe to:
Comments (Atom)