Hey Everyone!
Alright. Before you start complaining, yelling and throwing things at me, I am SO sorry I haven't been posting and Thread Thrills has been inactive. Every thing has been so busy for the last year, starting high school, having time to sew, all that stuff. Anyway, I'm restarting Thread Thrills for the New Year (2015 woo!) and there will be some changes taking place. For example, you may have noticed the new background.
Stay Tuned for now- this year brings new projects and ideas, inspiration and tutorials- all the works!
Showing posts with label Projects. Show all posts
Showing posts with label Projects. Show all posts
Friday, 9 January 2015
Saturday, 22 March 2014
Your Top Three- New Competition
Hi Guys,
 Here is another, well sort of, competition called ' Your Top Three'.
Basically it entails you sending me an email [ etskps@gmail.com ] telling me your top three sewing projects that you love/think are really cool or want me to do a post on. These will be published on my blog and will run throughout the whole year.
This is a great way for you sewers to speak out about your favourite projects. It could also inspire you all to complete some more interesting or more adventuress projects.
So, people, get choosing your top three!
Rules:
- Please keep it to no more than 1 entry per week, otherwise your top three will not be shown.
- Have fun!
- When entering, please tell me the name of the competition in the email. This will make it easier for me! Thank you!
Saturday, 15 March 2014
How to make a Pin Cushion 2
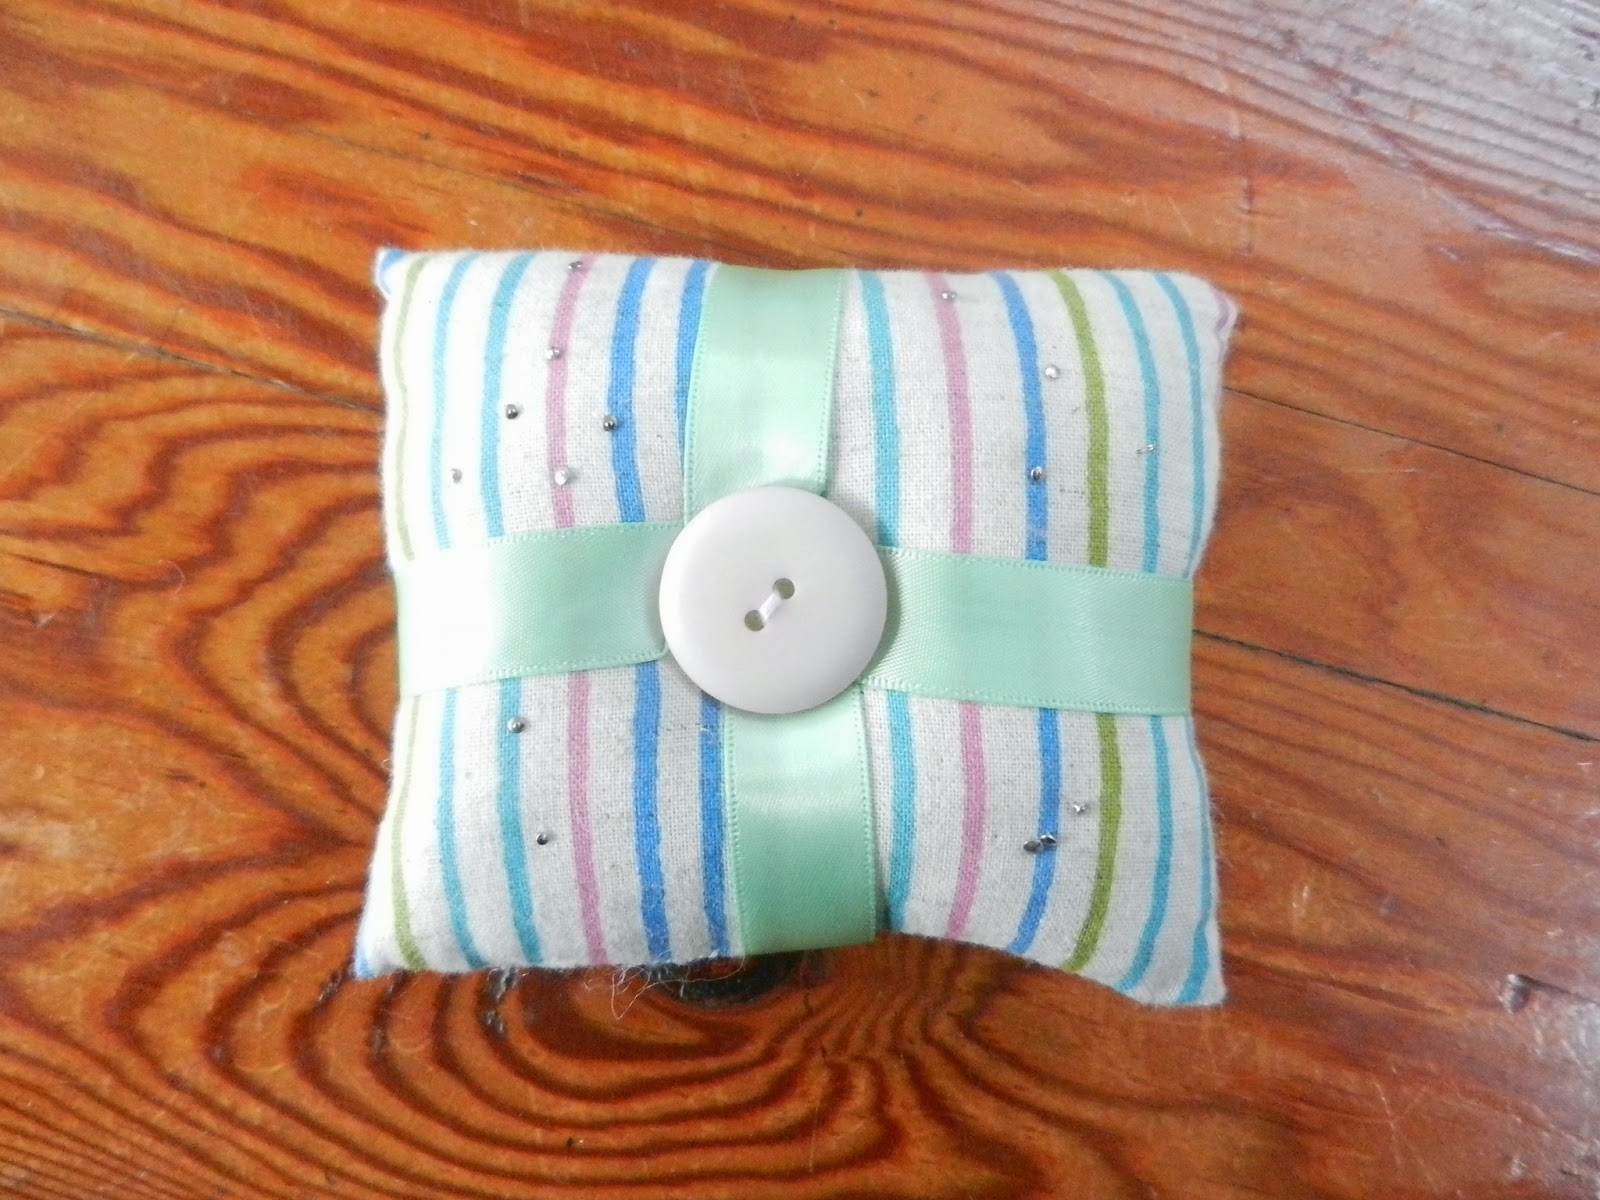
The other day in textiles class we made a pin cushion ( pictured ) using the sewing machine. I am not sure how familiar you all are with the sewing machine, but making something using it is more quicker and secures the best result possible.
So I decided to do a post on how to make a pin cushion 2 to show you the other way and to hopefully make you more confident with your machine, if you have already done your driving test.
What you need:
- A long ribbon
- A large button
- Sewing tool box
- Fabric of your choice [ roughly 24cm by 14cm ]
- Sewing machine
- Lots of stuffing
How to make the pillow
1. Iron your fabric and cut out to correct sizing [ if you have not already done so ]
2. Fold in half, making sure the wrong side is facing out, so you can see it. You should not be able to see the right side
3. Pin in place, making sure your pins are 1.5 cms away from the edge [ seam allowance ]
4. If your machine is similar to the brand, JANOME, set your stitch to A and your stitch length to your choice, but make sure the stitches are small.
5. Line your edge up with the 1.5 mark This will ensure you have a 1.5 cm seam allowance.
6. Begin sewing on the side next to your fold, and go all the way around until you reach the last side, a few centimeters before the fold.
7. Turn your pillow right side out.
8. Stuff very carefully through the hole. Make sure you make your pillow very compact and tightly full with stuffing.
9. Stitch the gap closed with a ladder stitch or slip stitch.
How to do the finishing touches
1. Cut a long length of ribbon of choice.
2. With one end, place in the center of the pillow. This will be your right side.
3. In a clockwise direction, wrap your ribbon around the pillow. Stop once you get back to where you have started. Make sure your ribbon is wrapped tightly for the best effect.
4. You can stop here if you would like. If yes, go to step 6.
5. Fold the edge of the ribbon upwards and wrap around once more. Stop at the middle and pin the ribbon in place. Make sure your ribbon is wrapped tightly.
6. Place button in the center of the pillow, where your ribbons should meet. Hold down tightly.
7. Come up through the back of your pillow with needle and thread. The thread can be a contrasting colour.
8. Pull thread gently through one of the button holes. Go back down through the other one. Repeat step 6-7 times.
9. Remove pin.
10. Finished!
Please note: Your ribbon may come undone if you do not wrap it tightly enough or hold in place. If you want, at the end of step 5, sew the ribbon together with a slip stitch for more secure results.
Bean Bag Buddies

One of my personal favourite projects in this book is the Alien, it is so adorable!
Also I recommend this book only if you are willing to buy lots of polar fleece and other expensive materials.
This book is available at DYMOCKS for around $24.99.
Alien pictured below.

Saturday, 22 February 2014
Star Trek Craft Book

There are so many great ideas in here. Medical Tricorder Purse, Padd Case, Spock Monkey, Tribbles... I'm getting carried away.
If you are a Star Trek lover, YOU MUST GET THIS BOOK!
Below are some pictures of some things you can learn to make.


Google Images
Stray Sock Sewing, Too!
 Hello Everyone! I know I have not done a post in a long time, my apologies. I have been very busy with
 school work lately.
I have had this book for quite a while, it was a gift from my aunt. The ideas in this book are excellent! This book is all about how to make sock toys. So many creative and fun projects! When I get round to it I will definitely do a post on these.
I'm not sure if you can buy it now, but it was purchased at DYMOCKS for $24.99, a great buy.
Below are some sock toys you can learn to make in Stray Sock Sewing, too.


Google Images
Friday, 7 February 2014
Lincraft Sale!
 Attention Everyone!
 There is a Lincraft sale on all fabric from Thursday the 6th of February to Sunday the 16th of February!
I am definitely going to go, this is an awesome sale!
To find out where your nearest Lincraft store is go to http://www.lincraft.com.au/storelocator/ .
Please note: The sale is only for fabric sold by the metre.
I will show you what I've bought on the ' Fabrics' page.
Tuesday, 28 January 2014
How to make a pony
 I was reading Crafty Creatures by Jane Bull, and came across this super cute pony. I decided to make it and it was surprisingly easy, and I received lots of positive feedback.
Difficulty Rating: Easy-Medium
Time: 2-3 hours approx hand sewn
What you need:
- Sewing tool box ( includes tapestry needle, black embroidery floss, 2 buttons )

- Lots of wool/yarn
- Scraps of felt
- Thread that matches your fabric
- Thread that matches your pony's ears
- Thread that matches your pony's tail and mane
- Fabric of your choice
- Matching felt scrap
- Template ( shown below )
- Lots of longs strands of wool
- Stuffing
How to make the body
1. Trace the template below and pin onto your fabric. Cut.
2. Turn both your pony shapes to the wrong side of the fabric. Pin together.
3. Sew a back stitch around the edge. Leave a gap for stuffing.
4. At the neck of the pony, snip 3 small triangles from the edge of the fabric to the seam. This will help shape the pony. Make sure your triangles do not interfere with your stitches.
5. Turn your pony right side out.
6. Stuff through the gap. Stitch it closed with a slip stitch.
How to make the tail and attach it
1. Get about 20 long strands of wool and tie in a knot at the top. If you wish, you can do less strands.
2. Cut the tail to the length you are satisfied with.
3. Place the knotted end of the tail onto the body at the rear end [ see template below ] .
4. Sew onto the body with a tapestry needle [ optional ] with strong stitches from the base of the knot to the body.
5. Tug to make sure it is sturdy. If not, repeat step 4.
How to make the mane and attach it
1. Get a strand of wool and tie a knot at the top. Tie another knot in the same place.
2. Sew the strand onto the beginning of the mane with matching thread. Use strong stitches from the base of the knot to the body.
3. Repeat step for all of mane. Place each strand next to each other until you reach your satisfied point.
4. Cut the length to your satisfaction.
How to do the finishing touches
1. Cut out the ears.
2. Position the ears in place at the top of the head.
3. Sew a small over stitch that attaches the ear to the body. Make sure it is strong and that the thread matches the ears.
4. Repeat step with other ear.
5. Sew the eye onto the correct position on the face with black embroidery floss.
6. Repeat with other eye.
You are finished!
Template:
Increase size by a few centimeters.
Thursday, 23 January 2014
How to make Bunting
 Bunting is a display of colourful flags hung up on string. Usually the flags have an appliqued letter on each one, to spell out a sentence or message, such as 'Happy Birthday!' or a person's name.
Here you can learn how to make your very own bunting. Enjoy!
Please note: I do not recommend making bunting if you are unfamiliar with a sewing machine or plan to make it by hand. Only make it by hand if you are doing a few flags, otherwise it will take a while.
Difficulty: Easy
Time: Depends on how many flags you are making but 1 flag takes about 1 hour and 10 minutes [ approximately ]
What you need:
- Fabric of your choice [ lots ]
- Sewing tool box
- Iron
- Different fabric for letters
- String
- Sewing machine [ recommended if doing many flags ]
How big should the flags be?
The flags can be any size you want but the standard size is 25cm long and quite wide at the top.
What shape should the flags be?

You can choose any shape you want, but most bunting shapes are a triangle, like the one I have done or the one on the right. Be creative!
To make the flags:
1. Iron both your fabrics, if you haven't done so already.
2. Trace the templates below and cut.
3. Pin the
template to your flag fabric and cut. Repeat step for all flags.
4. Fold back
half a centimetre on the two edges on the side. Pin in place. Repeat step for
all flags.
5. On the
top edge, fold back half a centimetre. Repeat step. Pin in place at the bottom
of the fold. This is where your string will go. Repeat step for all flags.
6. On the
two side edges, sew a stitch of your choice along the fold [back stitch is the
most common] Repeat step for all flags.
7. Poke a
thin object, such as a pencil, through the top edge fold. Repeat step for all
flags.
8. Sew a
stitch of your choice along the bottom of your fold. Repeat step for all flags.
How to make the letters

1. Cut out
the letters of your choice, and sew onto each flag with a stitch of your
choice.
Make sure
your letters are a good visual size. I also recommend a blanket stitch for
attaching the letters to the flags. Or, if your fabric is non-frayable, you can do a neat running stitch, back stitch or chain stitch.
To finish
1. Put your
flags in order according to letter. Thread your string through the top edge of
the flags. Tie a knot at both ends onto where you will hang it from.
You can also
do some embroidery onto your flag and create images, such as a cake to go with
the message ‘Happy Birthday!’
Some people
make a bunting collection of 26 letters for the alphabet, and then sell them in
a pack. Others make several copies of each letter in the alphabet and let
people choose
Either way,
bunting is fun to make and an awesome decoration.
Monday, 20 January 2014
How to make a Lucy's Monster
 This little monster is so cute and great for kids. It has a soft body [ made out of polar fleece ] and an adorable expression. A Lucy's Monster is simple to make and is a must have in your toy collection.
Difficulty rating: Easy
Time: 2-2 and a half hours hand sewn approximately.
What you need:
- Template
- Sewing tool box [ includes 2 large black buttons, black embroidery floss, and red thread ]
- Stuffing
- Polar fleece [ colour of your choice ]
- White felt for the eyes
How to make the face
1. Cut out the template below and pin onto the polar fleece. Cut the fabric.
2. Attach the eyes to the head with a blanket stitch, using the black embroidery floss.
3. Position the buttons onto the center of each eye and sew down with the black embroidery floss.
4. Sew a stitch for the mouth with the black embroidery floss. Try to make it into a small dot.
How to make the body
1. Turn the body right side out so the face is facing down.
2. Pin the body together.
3. Sew a back stitch around the body with a seam allowance of half a centimeter. Start just below one of the arms and finish at the top of the leg, so you have a gap of a few centimeters.
4. Turn the body inside out.
5. Stuff the body. Make sure you stuff the body tightly, especially the arms and legs.
6. Stitch the gap closed with a slip stitch of hemming stitch.
Your Lucy's Monster is finished!
Template: Shown below
140% may be a size to big for your Lucy's Monster so you might want to only increase the size by 60% or so.

New Poll: Project of the Month
I have started a new poll to get feedback on what project posts I have done. During every month, I will have a poll, located on the right side bar, where you can choose your favourite project of the month. I will have that and other polls as well.
Also, if you have any more feedback, feel free to tell me in the comments.
Also, if you have any more feedback, feel free to tell me in the comments.
Wednesday, 15 January 2014
How to make a Pin Cushion
 Pin cushions are very safe places to store your needles. You can make lots of different pin cushions but this one is the most basic one.
Difficulty: Very easy
Time: 20-30 minutes
What you need:
- Pins
- Fabric of your choice
- Matching thread
- Stuffing
How to make a Pin Cushion:
1.Cut out your fabric and turn to the faded side. If this does not apply to your fabric, such as felt, ignore step 1b.
2. Fold in half.
3. Sew a stitch of your choice along the two side edges.
4. If needed, turn right side out. Poke a pencil around the corners to make a straight shape.
5. Stuff the cushion evenly until you reach the top edge.
6. Sew a stitch of your choice along the top edge. To maintain a good look, do the stitch you did for the two side edges.
7. Insert pins!
Tip: Make sure the depth of your pin cushion is deep enough otherwise your pins will go right through it. This will be dangerous to you as well as being pointless.
Here are some images of some pin cushions! Please add more in the comments if you see ones that you like.
Note: Please be aware that some images may fail to show.


How to make an Arno Cat
Arno cats are soft toys that are easy to make. They make good gifts, as well as having your own.
Difficulty rating: Easy
Time: 1 hour to 2 hours hand sewn

What you need:
- 2 black buttons
- Lots of stuffing
- Black embroidery thread
- Sewing tool box
- Polar fleece for the body
- Contrast polar fleece or felt for the face
- Scrap of white felt for the eyes
- Template [ shown below ]
How to make the face
1. Cut out your arno cat template and place it onto your fabric. Cut around the template.
Note: Be careful when cutting your arno cat's shape. Polar fleece is a rather expensive material so you don't want to be making any mistakes;
2. Sew your white felt onto the face with a small blanket stitch.
3. Sew your two black buttons onto the center of each eye with a cross stitch using black embroidery thread.
4. Sew a small triangle, made up of small straight stitches, onto the center of the face, below the eyes.
5. Sew a smiling mouth with a back stitch that connects to the bottom corner of the triangle.
6. Position the face to the top of the arno cat's body, near the ears. Make sure it is straight.
7. Sew a blanket stitch around the face onto the body.
How to make the body
1. Turn your body right side out. Make sure your face is facing down.
2. Pin around the edges.
3. Sew a back stitch around the edges. Leave a gap.
4. Turn you body right side out and stuff through the gap.
5. Stitch the gap closed with a hemming stitch.
Your Arno Cat is finished!
Template: You may want to adjust the sizing.
Thursday, 2 January 2014
How to make a Pillow
I have been meaning to write a post on how to make a pillow for a long time but I have never gotten round to it. A pillow is a necessary thing to have and it is great if you can make your own. Try making pillows with a friend's name on it or embroider a picture to experiment.
 Difficulty Rating: Easy
Time: A few hours
What you need:
- Sewing tool box
- Iron
- Fabric of your choice
- Matching thread
- Pillow fill or stuffing
- Velcro strips [ optional ]
Sizes:
These are sizes I recommend, however feel free to make your pillow whatever size you wish.
37cms by 50cms Small
45cms by 65cms Medium
55cms by 80cms Large
How to make a Pillow
1. Iron your fabric according to material instructions. If unsure, put the iron settings to warm.
2. At the top of your fabric, on the wrong side, fold down a centimeter. Pin in place. You may want to fold it again for a neater look.
3. Sew a neat stitch of your choice across the fabric on the fold. Chain stitch looks really good. Make sure the wrong side of the stitching is on the wrong side of the fabric.
4. Flip your pillow to the right side. If you are on the right side already, skip this step.
5. Bring the bottom of the pillow forward and stop a few centimeters below your sewn fold. This will be the size of your pillow.
6. Pin the 2 edges on the side of the pillow in place and sew with a neat back stitch. Leave a centimeter at the top.
7. Fold down the top and pin in place. Sew a neat stitch of your choice with the right side of your stitch shown on the right side of the pillow.
8. Turn the pillow inside out.
9. On the two edges between the flap and the seams of the pillow, you may need to do a whip stitch there to prevent fraying. Instructions on how to do a whip stitch are available at the 'Stitches' page.
10. Stuff your pillow through the opening.
11. Turn your flap to the back of the pillow.
12. Finished!
To embroider or attach a sewn image or word:
Embroider your image or word just before you stuff your pillow. Use a blanket stitch to attach it to the front of the pillow, making sure your stitches go through both fabrics. To embroider, use your stitch of choice with embroidery floss/thread onto the front of the pillow.
To attach Velcro strips:
Adding Velcro strips or some other type of thing will make your pillow more secure. Velcro strips are good because they are easy to sew on. Attach them with a whip stitch to the fold at step 7. Above that on the wrong side of the flap also attach them. Make sure they are in line with the bottom ones.
Photos are in order according to steps.

Step 2

Step 2

Step 3

Step 3

Step 4

Step 5-6

Step 7

Step 10, 11 and 12
Subscribe to:
Posts (Atom)