Saturday, 29 March 2014

How to make an Apron- Part 1

It is completely necessary to make an apron at least once in your sewing years. They are really basic to make and are cute when cooking. Speaking of cooking, go visit my friend, who is a fabulous sewer, Suzzy!
http://suzzy-craftandcooking.blogspot.com.au/

What you need:

- Sewing machine [ must-have ]
- Sewing tool box, must include many, many pins!
- Fabric of your choice for the apron. Make sure it covers your front and is the length from about your collarbone to your thighs.
- Iron
- Thread that blends in well with your fabric [ for mine I used a type of yellow] and a relatively similar bobbin.
                                                                                                      Steps 2-3 below

How to make an apron- Cutting out the pattern

1. Iron your fabric if you haven't done so already.
2. Fold your fabric in half. Your fold should be facing towards you.
3. At the top right hand corner, NOT the fold, cut a round shape [ picture shown on the right ]. This is where your arm will come out, just beneath the shoulder. If you want, you can hold the fabric up against your body, in place, and trace the round part so it secures the best result. Make sure you cut through both sides of the fabric.
4. Unfold your apron. It should look like picture
3. Hold it up against you again and inspect the round sides. Should you make any adjustments?
5. Fold back half a centimeter from every outskirt, including the round parts. Repeat step. You may like to iron the folds down. This will make your apron smart and look very classy! In other words, you won't be able to see the frayed edges.
6. Pin together the folded edges.


Sewing your apron                                                                            Steps 1 to 4 below

 1. Set your stitch length dial to 2 and your stitch width dial to 0. This guide may vary on different sewing machine brands so just make sure you are using a small straight stitch.
2. Thread up your sewing machine [ see tutorial video ]
3. All your fabric should be on the left side of the machine. Also consistently through the whole sewing process, your stitches should be quite close to the inner edge of the fold.
4. Begin sewing at the bottom of your apron. It is best to start somewhere that is less visible because if you make an error, it will not draw attention. Make sure you do a reverse stitch.

Remember to stop sewing about half a centimeter [or wherever you are comfortable with] before your foot reaches your pins so you can take them out. Don't push too hard on the pedal, this will make you go fast and you could injure yourself and damage your apron. Slow and steady does it.

When you reach an edge where 2 folds meet, stop pushing on the pedal, and, using the flywheel, which is the large circle located on the right hand side of your machine and sew manually.This would consist of you bringing the flywheel towards you. Further directions are below if you have trouble with this .

How to manually sew the edge where 2 folds meet


1. Turn your flywheel in a forward motion, towards you. Release your hand.
2. Repeat step until you have reached the end of your fold.

During this time, your needle and presser foot should be down as usual. Please note I mean, foot, not pedal!

When it comes to sewing around the round parts, go slowly and on a slight angle, making sure your stitches match the roundness, not just a wonky line. When you do this you will have to rotate your fabric a lot.

Make sure when you start sewing and finis sewing, you do a reverse stitch a few time so that your stitches are secure.


At the end, this is what your apron should look like. All sewn around the edges.

This is the major part of how to make an apron. Part 2 is coming soon!

Sunday, 23 March 2014

Competitions

Hi Everyone,

When entering the competitions via email, please tell me the title of the competition your information This will make it more easier for me to publish your work!

Thank you!

Saturday, 22 March 2014

New Thread Thrills Competition-includes prizes!

Hi Guys,

Yes, it seems like competition season with all the new competitions I have been encouraging you all to do. But what is one aspect of a competition, what are you trying to win?  The answer is pretty obvious, you are trying to win a prize.

So far, all of the other Thread Thrills competitions give out prizes like, your work will be published on this blog. So, for a change, I am going to create a competition where the prizes will be some of my works, that you can win.

As I haven't thought of any new competitions yet, there will be a competition for who can think of the  best competition! Phew!

Please leave your entries in the comments.

Thanks guys!

Your Top Three- New Competition

Hi Guys,

Here is another, well sort of, competition called ' Your Top Three'.

Basically it entails you sending me an email [ etskps@gmail.com ] telling me your top three sewing projects that you love/think are really cool or want me to do a post on. These will be published on my blog and will run throughout the whole year.

This is a great way for you sewers to speak out about your favourite projects. It could also inspire you all to complete some more interesting or more adventuress projects.

So, people, get choosing your top three!

Rules:

- Please keep it to no more than 1 entry per week, otherwise your top three will not be shown.
- Have fun!
- When entering, please tell me the name of the competition in the email. This will make it easier for me! Thank you!

Friday, 21 March 2014

Competition

Hi Everyone,


I had an idea of a few competitions that all you sewer's could partake in. This would hopefully make my blog more engaging and so you can have lots of fun completing them. The only competition available so far is the one below.

1: My Favourite Sewing Project

This friendly competition would consist of, each and every month, you sewers submitting an image of a project you have completed. At the end of that month, when this competition closes, I will select my favourite project and post it onto my blog so all my blog readers can see the awesome work you have done!
If you are interested please submit your entries to my email etskps@gmail.com

Rules:

- Project must be completed by YOU, not by someone else, eg, you send me an image of a project from the internet. I will be able to tell as I am a trained detective!!!
- Entries must be in by the closing time [ I will tell you when submitting times closes ]
- Have fun when you are doing it! Don't stress! This is meant to be a fun competition!
- Please tell me the title of the competition when you send me your entry. Thank you!

Note: Entries close on Wednesday the 28th of April! As this is the first time we are doing this you can have some extra time to create your project!

Posts that are coming soon

Hi Guys,

I know I have promised posts a long time ago, like how to make an apron, and I hadn't got round to them as I haven't been to Lincraft recently. Now I can give you a definite list of what's coming next:

- Video tutorial: How to operate the sewing machine
- A Different Type of Hair Tie: The Scrunchie
- How to make an apron
- How to make a skirt

Of course other posts will be coming as well, during and after these posts.

Keep happy and keep sewing!

Saturday, 15 March 2014

Apologies, Posts are coming soon!

Yes, I know I have not done posts for a while. But don't  worry, there are more coming soon! I have been busy with thinking of some new projects and...

- Making a video tutorial!

This video tutorial is on how to operate and set up your sewing machine. It will be coming in a few days or a few weeks, I really don't know.

So yes, Thread Thrills readers, we are moving into the Sewing with Sewing Machines stage!

This will unlock many more exciting and advanced projects, and ones that won't take as much time!


How to make a Pin Cushion 2

As you will know, I have already done a post on how to make a pin cushion. But this is not the only way.

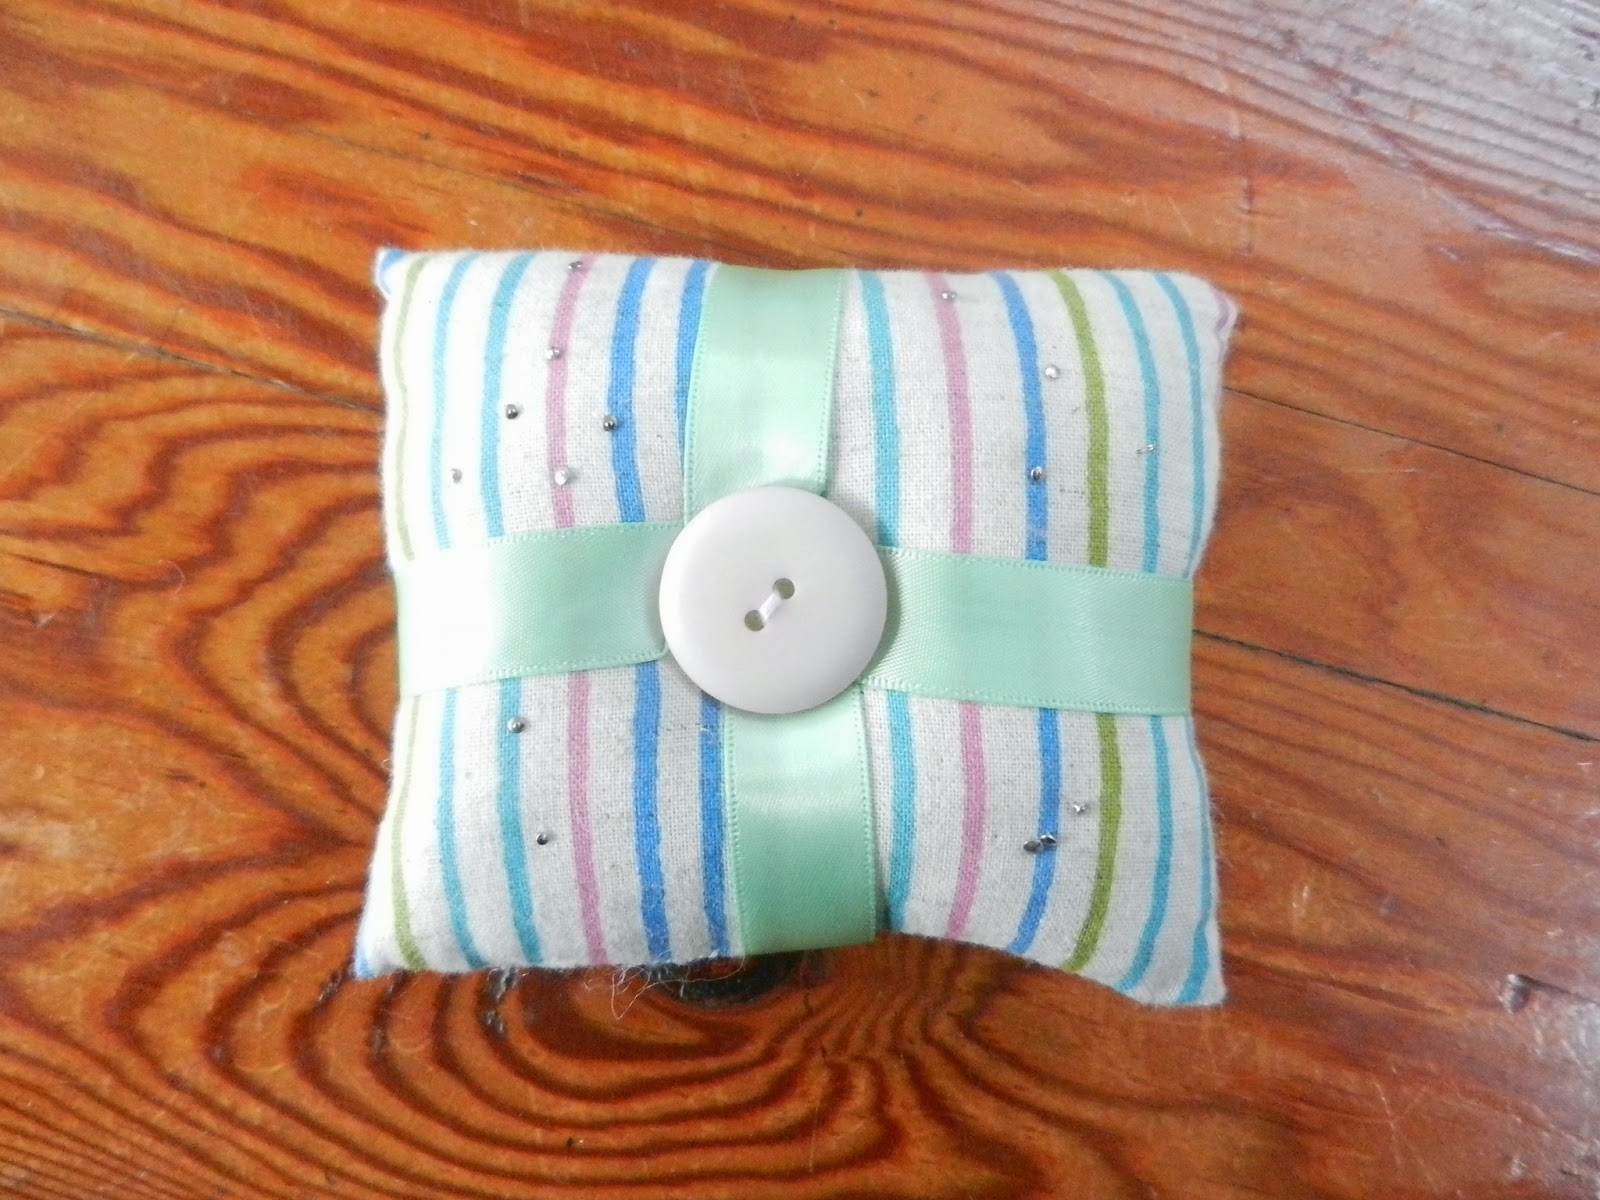
The other day in textiles class we made a pin cushion ( pictured ) using the sewing machine. I am not sure how familiar you all are with the sewing machine, but making something using it is more quicker and secures the best result possible.

So I decided to do a post on how to make a pin cushion 2 to show you the other way and to hopefully make you more confident with your machine, if you have already done your driving test.

What you need:

- A long ribbon
- A large button
- Sewing tool box
- Fabric of your choice [ roughly 24cm by 14cm ]
- Sewing machine
- Lots of stuffing

How to make the pillow

1. Iron your fabric and cut out to correct sizing [ if you have not already done so ]
2. Fold in half, making sure the wrong side is facing out, so you can see it. You should not be able to see the right side
3. Pin in place, making sure your pins are 1.5 cms away from the edge [ seam allowance ]
4. If your machine is similar to the brand, JANOME, set your stitch to A and your stitch length to your choice, but make sure the stitches are small.
5. Line your edge up with the 1.5 mark This will ensure you have a 1.5 cm seam allowance.
6. Begin sewing on the side next to your fold, and go all the way around until you reach the last side, a few centimeters before the fold.
7. Turn your pillow right side out.
8. Stuff very carefully through the hole. Make sure you make your pillow very compact and tightly full with stuffing.
9. Stitch the gap closed with a ladder stitch or slip stitch.

How to do the finishing touches

1. Cut a long length of ribbon of choice.
2. With one end, place in the center of the pillow. This will be your right side.
3. In a clockwise direction, wrap your ribbon around the pillow. Stop once you get back to where you have started. Make sure your ribbon is wrapped tightly for the best effect.
4. You can stop here if you would like. If yes, go to step 6.
5. Fold the edge of the ribbon upwards and wrap around once more. Stop at the middle and pin the ribbon in place. Make sure your ribbon is wrapped tightly.
6. Place button in the center of the pillow, where your ribbons should meet. Hold down tightly.
7. Come up through the back of your pillow with needle and thread. The thread can be a contrasting colour.
8. Pull thread gently through one of the button holes. Go back down through the other one. Repeat step 6-7 times.
9. Remove pin.
10. Finished!

Please note: Your ribbon may come undone if you do not wrap it tightly enough or hold in place. If you want, at the end of step 5, sew the ribbon together with a slip stitch for more secure results.


Bean Bag Buddies

This book ' Bean Bag Buddies ' is an awesome book by Nicki Wheeler. It features over 50 fun designs of soft and cuddly toys that are creative and fun to make. I recommend only Intermediate sewers for this as some of the designs may require a machine and are quite tricky.

One of my personal favourite projects in this book is the Alien, it is so adorable!

Also I recommend this book only if you are willing to buy lots of polar fleece and other expensive materials.

This book is available at DYMOCKS for around $24.99.

Alien pictured below.

Saturday, 22 February 2014

Star Trek Craft Book

I bought this book close to Christmas, planning to make some things for my brother. For those of you who don't know, I love Star Trek! When I came across this book [ by Angie Pederson ], I HAD to buy it.

There are so many great ideas in here. Medical Tricorder Purse, Padd Case, Spock Monkey, Tribbles... I'm getting carried away.

If you are a Star Trek lover, YOU MUST GET THIS BOOK!

Below are some pictures of some things you can learn to make.


Google Images

Stray Sock Sewing, Too!

Hello Everyone! I know I have not done a post in a long time, my apologies. I have been very busy with
school work lately.

I have had this book for quite a while, it was a gift from my aunt. The ideas in this book are excellent! This book is all about how to make sock toys. So many creative and fun projects! When I get round to it I will definitely do a post on these.

I'm not sure if you can buy it now, but it was purchased at DYMOCKS for $24.99, a great buy.


Below are some sock toys you can learn to make in Stray Sock Sewing, too.


Google Images

Monday, 10 February 2014

Felt


Today I am going to talk about FELT. Felt is used in sewing for all different projects. It can be used to make a hair tie, a toy, a pocket book, a feltie, etc.

There are different types of felt, such as described in the image below. Here are some: Hand dyed wool, recycled eco felt, 3mm Wool felt, tough felts, soft felts, craft felt, blended wool felt, 100% wool felt.

What type of felt should I get?

That is absolutely up to you. I suggest getting eco friendly felt to be a friend to the environment.
However some projects may require a specific type of felt, so I will let you know when that requirement must be in place for projects.

If you have not purchased felt before or would like some for an upcoming celebration of yours, buy or ask someone to buy a felt pack. They are good to start with and come with the basic colours. I have
one that is similar to the image below.

Where do I purchase felt?

Felt is available at craft shops and sewing shops.


Celebration Season!

           
Cel-e-brate, good times come on! That is such a daggy song, but it's true!            

Thread Thrills is beginning it's celebration season. We are coming up for:

- 2000 page views
- 6 month anniversary [ tomorrow! ]
- and 50 post anniversary! [ already had ]

This calls for a major celebration. Some of my posts will reflect on how far I have come with making my blog and how far your sewing skills have improved during this time period.

I would just like to say thanks to all my followers and subscribers for reading my posts. It has given me great pleasure when I see people have commented, or participated in the polls. Most of all to hear your feedback on my posts.

Thanks again. I hope you have a fantastic year in 2014 and keep those sewing skills going!


Note: I promise the posts on how to make a skirt and how to make an apron are coming really soon, I am just having a small delay!

Friday, 7 February 2014

Lincraft Sale!

Attention Everyone!                                                    
There is a Lincraft sale on all fabric from Thursday the 6th of February to Sunday the 16th of February!

I am definitely going to go, this is an awesome sale!

To find out where your nearest Lincraft store is go to http://www.lincraft.com.au/storelocator/ .

Please note: The sale is only for fabric sold by the metre.

I will show you what I've bought on the ' Fabrics' page.

Thursday, 6 February 2014

Elastic

Elastic is used in sewing mainly for making clothes. You usually find it in the waistband of a garment. To make a waistband tighter, you put more elastic in. This is usually how elastic is used for hand sewing.

I recommend that you have elastic in your sewing tool box. It will come in handy and especially has I put more posts up on how to make clothes.

What type and size of elastic should I get?

It doesn't really matter what brand or type your elastic is. but it is best to purchase it at a proper craft store, however you can but elastic at a discount store as well.

The size of your elastic depends on what you are going to make. Obviously your elastic length will be long as it comes in rolls, but it depends on the width of your elastic.

I find it best to use wide, woven elastic for garments like skirts and leggings. It would be a tad stronger than a thin strip and would be less likely to fray.

Basically, you can use a thin strip of elastic for all other projects.

If you are having trouble deciding what width you should get, just tell me your project and where you plan to buy your elastic from and I will tell give you the answer.

Note: Quality of elastic may vary between stores. Choose a brand that you trust and think is good quality.

Woven or Braided Elastic

Strongly woven or braided elastic is the strongest type, I recommend you choose this. Look on the package label to be sure.

Note; Always check how long the elastic is before you buy some! This is critical to your sewing!

Up Coming Post: How to make a Waistband Tighter using Elastic


Courtesy of Google Images

Friday, 31 January 2014

Cutting Fabric

Cutting fabric is really important [ then again, most things in sewing are! ]. It can seriously affect your work, and if you do it incorrectly, you will waste fabric.

How to Cut Fabric-Rules

1. Always cut a shape from the edge of the fabric. If you cut it from the centre, you will waste fabric and when you want to do other projects with the same fabric, that require lots of the same material, you will have to buy more because your other shape will not fit in the space left.
2. When you have a shape like a pony, for example, there are some parts of its shape that need to be rounded, such as a neck. What you do is you snip a few small triangles from the edge of the fabric to the stitches. However you should only do this if instructed.
3. Cut slowly. If you cut your fabric really fast you can make a mistake, so it's best to cut slowly and steadily.
4. Make sure your fabric is straight, not crumpled! This rule is very important. Your fabric MUST be straight and flat before you begin cutting. If it is crumpled, your shape will go all wrong and you would've wasted fabric.
5. Cut your fabric on a flat surface. Never cut your fabric in your lap or on an unsteady surface. Cut on a table or a tray, or anywhere else that is flat, not a bed!